

Using the DMR-6X2’s built-in GPS receiver
One of the cool features of BTECH’s DMR-6X2 is the built-in GPS receiver. When enabled, it gives you your latitude and longitude, height above sea level, date, and time of day. And, if you’re moving, it will even tell you how fast you’re walking or driving.
To enable the GPS receiver manually:
This can also be done using the Customer Programming Software, or CPS. After you’ve opened the program, click Public → Optional Settings → GPS/Ranging. On the page that pops up, set both GPS and Get GPS Positioning to On. After you re-program your radio, the GPS receiver will be on by default.
Once enabled, you can easily check the GPS info. To do this manually:
- Press (Menu) to enter the main Menu.
- Page down and select GPS.
- Select GPS Infor, and the radio will display the GPS information on the LCD.
You can also program one ofo the function keys to display this information with the push of a button. I programmed the PF3 key to display the GPS information with a short press. This can be done manually via the menus or with the CPS.
You can also program one ofo the function keys to display this information with the push of a button. I programmed the PF3 key to display the GPS information with a short press. This can be done manually via the menus or with the CPS.
If this isn’t cool enough, you can also program your DMR-6X2 to report your position via a DMR repeater or hotspot. The first thing you need to do is to add a channel specifically for APRS. Program this channel with the frequencies, color code and time slot that will let you access the repeater or hot spot that you intend to use. In addition to these settings, you will also have to set APRS Report to “ON” and APRS Report Channel to “1.”
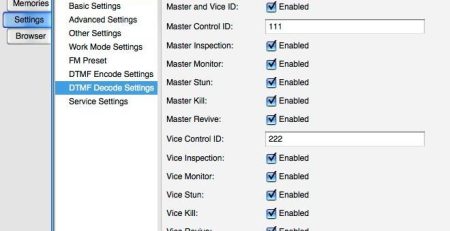
Next, you’ll have to set up the Digital APRS Information. To open the screen in the CPS to do this, click, Diigital, then APRS. A screen like the one below will pop up:
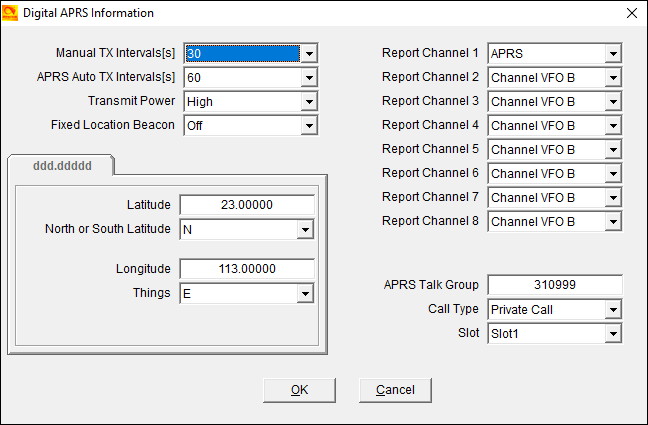
- Manual Tx Intervals
- APRS Auto TX Intervals
- Transmit Power. Set to High for repeaters, Low for hotspots.
- Fixed GPS Beacon. Set to Not Used if you want to use the actual GPS data as the location. Set to Used to transmit a fixed location. In this mode, the radio will use the “dd.mm.nn” settings you enter below instead of the GPS.
- Report Channels. Set Report Channel 1 to the channel name you used for your APRS channel.
- APRS Talk Group. The Brandmeister talk group in the USA is 310999.
- Call Type. Set to Private Call.
- Slot. Set this to the same time slot used for the APRS channel.
Before re-programming your radio, remember to assign your APRS channel to a zone. The radio will not display the APRS channel if you do not do so. Once you have done this, download the new programming to your radio.
To turn on the DMR APRS, select your APRS channel and press the PTT switch to start sending APRS data. After pressing the PTT switch the radio will display “Sending Digi APRS Data,” and as long as the APRS channel is selected, the radio will send APRS data at your selected interval.
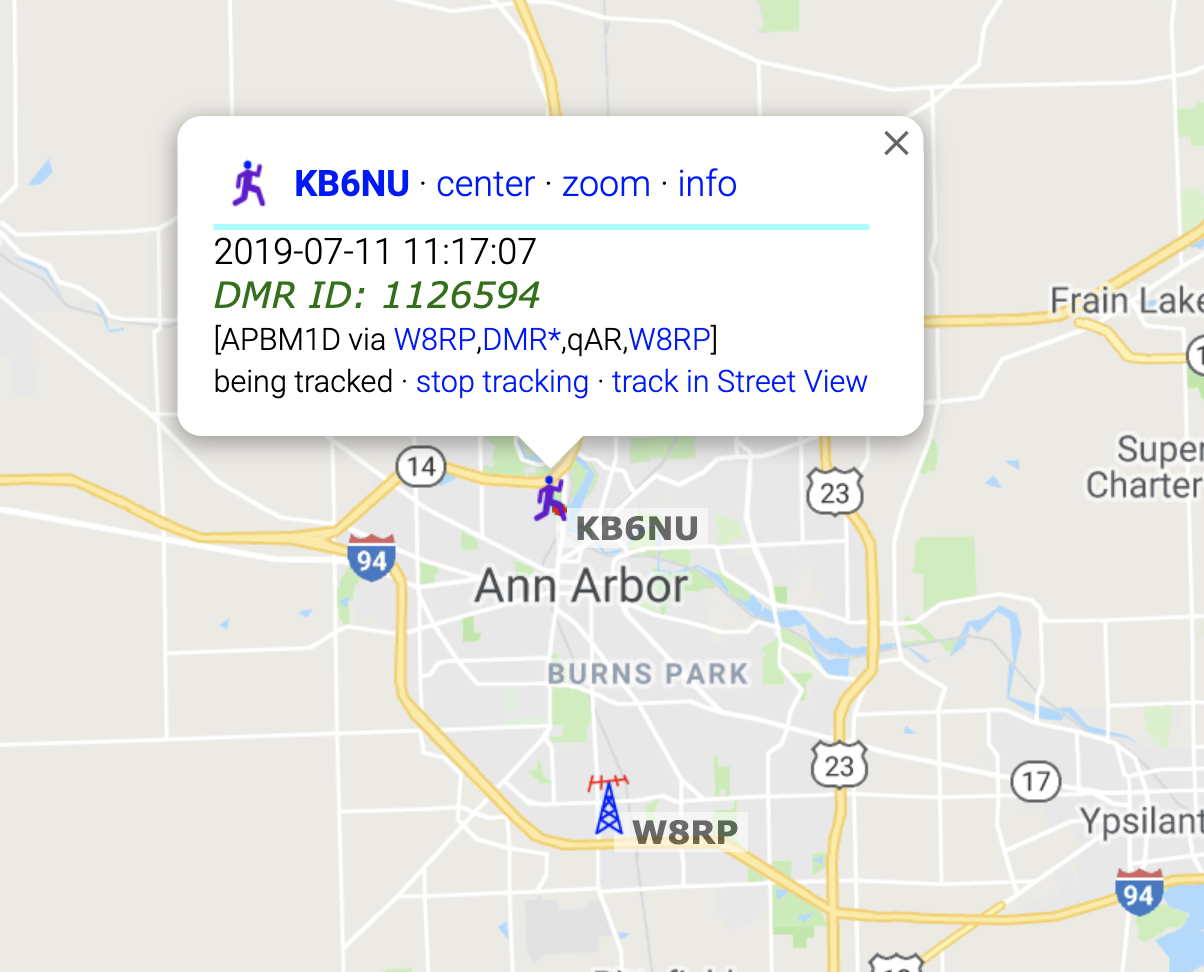
Finally, look for yourself on aprs.fi to see if you’ve been spotted. Below is a screenshot of aprs.fi spotting me once I got this up and running.


Comments (3)
My btech 6×2 won’t stop trying to send gps info to another radio nearby, even when my GPS is off. So much so, that I can’t do anything else on the radio because it won’t stop with the GPS pop ups. How do I stop this?
Go to the interval settings under the aprs settings menu, and set the interval to off.
My GPS height above sea level is wrong. It seems to be about 1000 feet too low. I’ve tried to turn it of then back on and it is still way off.