Using the BTECH UV-PRO with Winlink Tutorial
If you’re a radio enthusiast, you’ve probably heard of Winlink, a global messaging system that uses radio frequencies to send emails, files, weather reports, and even GPS data. Winlink is especially valuable in emergencies or remote locations where traditional internet access might not be available. It provides reliable communication by bridging traditional email with radio signals, making it perfect for ham radio operators, emergency responders, and adventurers alike.
With your BTECH UV-PRO radio, you can easily connect to Winlink Express on Windows. Here’s a straightforward tutorial to help you set up your UV-PRO radio for Winlink.
Setting up your UV-PRO Radio:
- On your UV-PRO radio, navigate to:
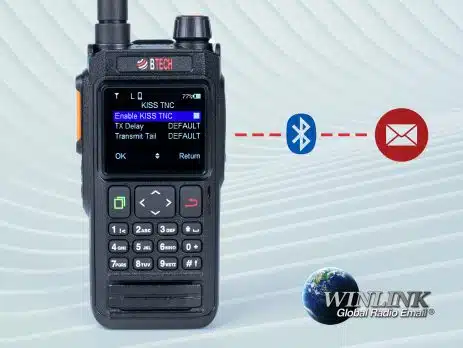
- Main Menu > General Settings > KISS TNC – make sure the “Enable KISS TNC” box is checked.
- Go back and select General Settings > Digital Mode – ensure the “Enable” box is unchecked.
- Set “Share Location” to 600 seconds.
- Set “Digital Channel” to any channel and “Format” to APRS.
- Find the local VHF Winlink frequency for your area. Save this frequency as a memory channel on your radio (name it something easy like “Winlink”).
Pairing UV-PRO Radio with Your PC:
- Turn on Bluetooth pairing mode on the UV-PRO:
- Navigate to Menu > Main Menu and check the “Pairing” box.
- On your Windows computer:
- Right-click the Start button, then select Settings.
- Go to Devices, then click “Bluetooth & Other Devices”.
- Click “Add Bluetooth or other device”, then choose “Bluetooth”.
- Select “UV Pro” from the list and follow the on-screen prompts to pair.
- After pairing, open Device Manager by right-clicking the Start button again.
- Expand “Ports (COM & LPT)” to see your Bluetooth devices.
- Write down the COM port numbers listed (you’ll need these later).
Connecting UV-PRO with Winlink Express:
- Open Winlink Express on your PC.
- On the main screen:
- Select “Packet Winlink”, then click “Open Session”.
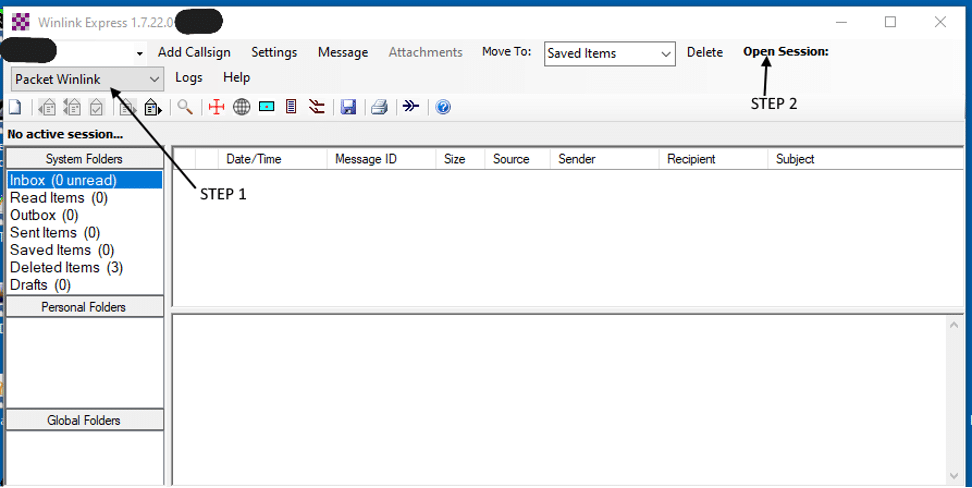
- Select “Packet Winlink”, then click “Open Session”.
- A new window opens:
- Click “Settings”.
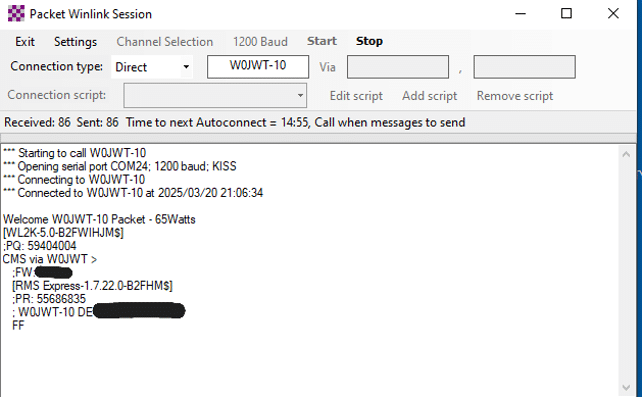
- Under “Serial Port”, select one of the COM ports you noted earlier.
- Click “UPDATE” to save settings and close this window.
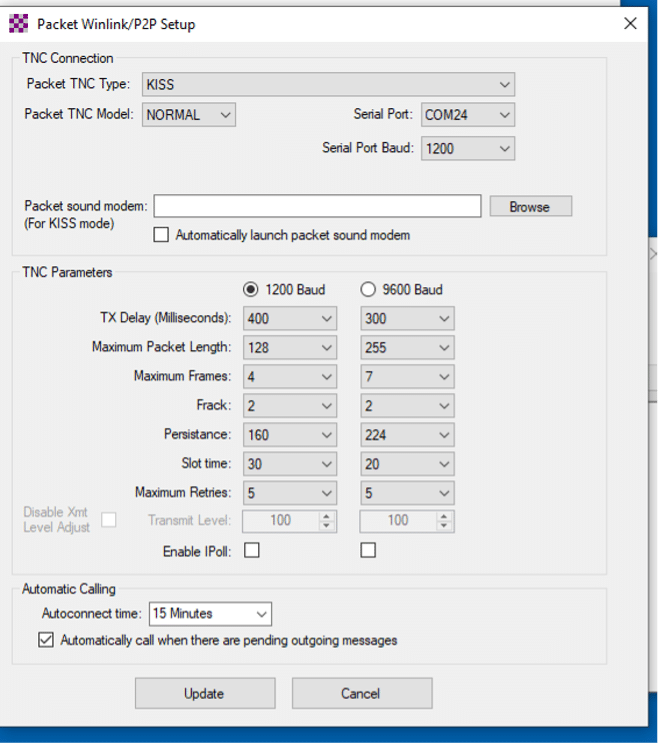
- Click “Settings”.
- Back on the Packet Winlink window:
- Click “Start”. Watch the data screen for confirmation that you’re connected to the UV-PRO.
- When successfully connected, the UV-PRO radio will show a phone icon.


Important
- Remember, you cannot connect to the UV-PRO via its programmer app while using Winlink. Close this app and any other programs that may connect to your UV-PRO.
- Initially, you might need to try different COM ports to find the correct one. Once connected successfully, your settings will be saved, simplifying future connections.
With the BTECH UV-PRO’s versatile Bluetooth TNC capability, you now have a powerful tool that makes your radio a flexible hub for emergency communications, remote messaging, and reliable connectivity wherever you are. Enjoy seamless radio-to-email communication and explore all the possibilities your UV-PRO radio offers!


Comments (15)
Good info. Please duplicate for WOAD, Winlink On AnDroid.
I use WOAD too on my Samsung Galaxy S22 Ultra for Winlink.
I too use WOAD on my S22. Make Winlink work on BF‑F8HP PRO please.
Good info – Agree, would like similar detail for WoAD.
Please also include info for Linux.
Would also like to have info for connecting APRS to a host computer with Windows and Linux and, if possible, sharing GPS info as well.
I assume you have to configure rfcomm0 or 1. I don’t know which channel
then bind rfcomm to some known address. This is of interest to me too woad on tablet is nice. Linux Mint/yaac wine rmsexpress on tablet is nicer. PAT on linux Menu would be a win too, if not Wine rmsexpress. I suppose
quick question, how can i find out if I’m actually making a connection to the service? what should I be looking for in the waterfall from the SoundModem?
Please also detail the process for connecting to Linux with Pat for Winlink and/or YAAC for APRS. This is especially important now that Microsoft has announced the EOL for Win10. There are many older Windows computer that cannot be upgraded to Win11 that will work great with Linux. Pairing one of those with this radio for emergency communications would be great.
Reach out to [email protected] for setup help
I cannot connect to any gateways, using the radio, I cannot connect to my computer to use win link express , not even if I go sit outside to attempt to use radio mail on my phone. even if it is connected through Bluetooth to my computer I only ever have 1 comport unless I plug in my radio programming cable which is com 4. you know I just had a thought thought what if I check the Bluetooth adapter on my computer, because my comport/lpt is not reporting it correctly Better instructions could be published to use all of the features including digipeater and i gate because I know there is a way to piece this all together without the use of raspberry pi that I have been reading so much about that I need to have.
Reach out to [email protected] for any setup issues
Is there a like tutorial for the BTech UV-25X4?
in your instruction, “Go back and select General Settings > Digital Mode – ensure the “Enable” box is unchecked.” should read “Go back and select General Settings > Digital Mode – ensure the “Enable” box is checked.” because when you set share location to 600, Digital Mode is automatically enabled.
Winlink freq way out of range of UV Pro! I must be missing something. Winklink towers are all very sparsely spaced and the freq are mostly all in the 7MHz range. Way out of the UV Pro ability.
“”” Find the local VHF Winlink frequency for your area. Save this frequency as a memory channel on your radio (name it something easy like “Winlink”).”””
Huge step left out of the instructions:
“” Find the local VHF Winlink frequency for your area. Save this frequency as a memory channel on your radio (name it something easy like “Winlink”).””
If you go to the Winling site and look for towers. They are extremely sparse throughout the country. In the state of Florida, there’s only three and not a single one anywhere near Central Florida or the middle of the state. One on East Coast two on the West Coast. Plus the majority of all these wind link towers run down in the 7 to 10 MHz range. That’s way outside to capabilities of the UV pro. I can connect my radio to Winling express create a message and try to send it And it will work meaning it will attempt to send whatever frequency you have in there. But a huge step that is missing is where are the wind capable towers located?
Worked great! thanks for taking the time to help out.