
Program your UV-5X3 with CHIRP
One of the most frequently asked questions that we get here at BTECH is, “How do I program the channel memories in my UV-5X3?” The answer is, “Get CHIRP!” CHIRP is a free, open-source application for programming many different radios from dozens of manufacturers. You can use CHIRP to program 11 different BTECH models, including our amateur radios and our GMRS and MURS radios. In this post, we’ll show you how to program a BTECH UV-5X3 with CHIRP.
CHIRP runs on Windows, MacOS, and Linux operating systems, but in this post, I’ll be describing how to install and use the Windows version of CHIRP. To install CHIRP, first go to the CHIRP website and click the “get it!” button. On the next page, look for the reccomended version for your operating system (highlighted in green) and click on it to download the installer. Once the installer has downloaded, double-click on its icon and the installer will install CHIRP on your computer.
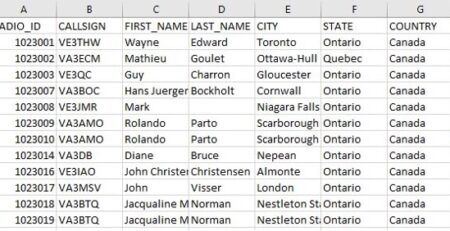
Next, open the app and download the data from the radio. You do this by clicking Radio→Download. If you’ve just purchased your radio, you’ll see something like this:
 You can save this information, so that you can restore the radio to the factory settings later, by clicking on File→Save.
Next, enter the frequencies and repeaters that you want to program into your radio. I live in Ann Arbor, MI, so I’ve entered the 2m simplex frequency (146.52 MHz), and the repeaters that I can hit locally. Remember to also program the tone mode and tone frequency of the repeaters. You won’t be able to access the repeaters if these aren’t set properly. Here are what my channels look like after I edited the repeater information.
 Next, connect your UV-5X3 to your computer using the PC03 Programming Cable and turn on your radio.
Finally, you’re ready to program the radio. Click Radio→Upload to Radio, and CHIRP should download the memory channel information to your UV-5X3. Disconnect the cable and check to see that the radio has been programmed correctly.
For more information, check out the following links:


Comments (26)
I have my radio connected to the computer using the USB programming cable for my Baofeng UV-5X3 but I do not see Click Radio→Upload to Radio. What am I doing wrong? I have already downloaded the latest CHIRP.
You first need to create an image from the radio (via download). You need to download from the radio first
It is a new Baofeng UV-5X3 so there is nothing on the radio yet. I see the radio on the computer. And am trying to download the frequencies onto it.
I just tried to transfer Chirp to the radio and ended up with the following message: An error has occurred
Error reading data from radio: not the amount of date we want. OK
What is the procedure for applying the TX inhibitor function to a VHF channel on a UV-5X3?
In CHIRP set Duplex to ‘OFF’
Hello, I’m trying to program a btech UV5X3 with chirp, and it indicates error reading from radio, I can program my other Baofengs with no problem. I tried resetting all with menu #42 and it only reads:
source?
and won’t reset. Is there another method of resetting it other than the menus?
Reach out to [email protected] to diagnose your issue
When you first install the K-Plug into the Jack on the BTECH UV-5X3, push the plug in and listen for the first of two “Click’s.”
Then grab the radio horizontally.
With your thumb on the BACKSIDE of the connector and your fingers over but not on the “PTT Button” like a C-Clamp,”
squeeze your thumb down and listen for the second click, that is very slight sounding click.
[ I made the same mistake, of not squeezing the heck out of it ].
Now it works.
**NOTE**
I also made the mistake of looking for the Radio: BAOFENG Tech UV-5X3, with “No Joy…”
Instead, look for BTECH UV-5X3 in the pulldown under the “RADIO Tab.”
Then downfold an image of the Radio, if STOCK, will look like the table above.
If no Joy, then make sure to test out the other “Port’s” available under the Radio Model number.
Good Journeys.
Thank you! I couldn’t figure out why this thing wouldn’t download, and it turned out to be that second click.
Having never operated 220 before, I bought the uv-5RX3 as a curiosity. I’ve been trying to program it with CHIRP, but I see that this particular model doesn’t appear on the pull down menu. Using (for instance) UV-5x will allow me to upload/download 2m and 70cm, but it tells me that 220 band freqs are outside my radio’s parameters. Any recommendations apart from manually programming via the keypad?
The UV-5X3 and UV-5RX3 are not the same radio, Miklor has a great breakdown at: http://www.miklor.com/BT5X3/5X3-Diff.php
Hi folks. I Just received a new BTECH UV-5×3 a couple weeks ago. Have been using it successfully in VFO mode. Just starting to do programming.
I downloaded and saved the base image in CHIRP. I updated the image to use channels 0 through 23 for my most commonly-used frequencies. I was able to upload it to the radio. However, not all of the details I input for the repeaters appear to have transferred.
For the frequencies of repeaters, CHIRP auto calculated the offset and direction. All of the simplex and repeater frequencies transferred to the proper memory channel locations. The direction and tone also appear to have transferred, but the offset did not. In the display, instead of seeing the “+” or “-” indicator, I see an indicator that says “+-“. And in all cases, the offset shows all zeros.
If I try to manually specify the offset for a channel, using the menus, this disappears when I exit the menu and reverts back to all zeros.
I followed the instructions in the manual, to delete the memory channel contents, and then re-save it from VFO mode. The frequency, direction and tone came over, but again the offset shows all zeros.
When I am in VFO mode I can set frequency, direction, offset and tone just fine.
Has anyone seen this, or have suggestions? Thanks much.
Hello! I am having the same issue in December of 2025. Did you ever find a solution? If I manually do the set up on the radio, it works just fine. For example, I set up a a repeater according to the manual, and when I enter listen mode, the frequency changes on the display, but not on the channel i set up via chirp.
I’ve very new to this, but seem to be having the same problem with my BTECH UV-5X3. I entered the transmit frequency, and Chirp correctly calculated the offset. I saved everything and successfully uploaded to the radio. The channels themselves are saved but my offsets all show 000.000
This is normal behavior, the Offset menu is only used in the VFO mode – but you can confirm your offset is programmed in channel mode by looking for the. +/- icon or setting the display mode (MDF-A) to “FREQ” while transmitting and receiving it will show the frequency in use (including the offset)
When I am selecting settings for the UV-5X3 in CHIRP, I get an error saying ” Error Applying Settings Must be between 220.0000-226.9975″. How do I fix this?
Same here. I looked and didn’t see it widely reported on the web yet so perhaps this might be an issue with the latest version of Chirp (20230313) and this specific radio. The issue means I can no longer use the UV-5X3 on the field.
For a UV-5X3 I ended up using the RADIODDITY UV-5RX3 in Chirp and it allowed 220 frequency entry. You might try that.
Do not do this, those are completely different radios. You would select the ‘BTECH < UV-5X3' in CHIRP
Wes, I had this exact same issue. You can fix it by uploading an image from your radio into Chirp. Then go to the Settings tab. Then go to the “Word Mode Settings” on the left hand menu bar. Then, look at your VFO settings that have “VHF” in the title – one of them is probably in the 420-450 range. Change it to be in the range of 222-225 and your error will go away.
I was not able to locate my model UV-5RX3 in Chirp’s radio list and when I used a (generic?) UV-5R it would not accept calling frequencies in the 1.25 mHz band. It was also not able to connect to Reapeaterbook at all saying that the SSL connection was timing out. I did try to connect to repeaterbook through the browser and it was very slow. Is there a way to increase the wait time for Chirp?
For a BTECH UV-5X3 What buttons do I have to press to get into Factory.
I had to change from Baofeng to BTECH in the radio drop down and then the UV-5×3 is there to select.
I thought it was a Baofeng brand but it’s BTECH brand as they all look the same.
I thought the UV-5×3 would allow you to listen to 120-121 (air control) but not transmit, wont take the frequency. Not sure if it can be done. Ordering a pair of 5RM’s hope they do it. Any info would be appreciated.
You would want the BF-F8HP PRO which listens to aviation bands